Despite their durability, Hydrovane units do develop faults over time. Worn vanes, degraded oil, clogged filters, poor ventilation — each one moves the compressor closer to unplanned downtime. The difference between a minor service call and a major rebuild often comes down to how quickly the symptom was recognized and addressed.
This guide covers the most common Hydrovane compressor problems, their root causes, a step-by-step troubleshooting process, and clear guidance on when a repair is sufficient versus when professional assessment is needed.
Key Takeaways
- The most common Hydrovane faults are failure to start, excessive noise, low pressure output, overheating, and high oil consumption
- Most problems trace back to worn vanes, oil system issues, clogged filters, or electrical control faults
- Early diagnosis using a structured process prevents simple fixes from becoming full rebuilds
- Internal vane, rotor, or cylinder issues require a qualified technician, not DIY repair
- Oil changes at 2,000 hours or 12 months (HV11–HV45) are the single most effective preventive measure
Common Problems With a Hydrovane Compressor
Hydrovane faults follow predictable patterns tied to the rotary vane mechanism, oil system, and control components. Catching the right symptom early is the difference between a $200 filter swap and a $2,000 rebuild.
The four most common problems are:
- Compressor won't start
- Excessive noise or vibration
- Low air pressure or slow pressure buildup
- Overheating and thermal shutdown
Problem 1: Compressor Won't Start
Watch for: no response when powered on, motor humming without engaging, or the unit tripping immediately after startup.
Common causes:
- Low oil level triggering thermal protection (HV11–HV45 units warn at 107°C / 225°F and shut down above 110°C / 230°F)
- Incorrect pressure switch settings or a faulty pressure sensor
- Power supply issues — blown fuse, tripped breaker, or loose terminal
- Built-in time delay preventing pressurized restart after a recent stop cycle
- Degraded start capacitor on older units (RS controller capacitors should be replaced after extended storage periods per the HV11–HV45 manual)
If the motor hums but doesn't engage, thermal protection and time-delay restarts are the first two things to rule out before moving to electrical components.
Problem 2: Excessive Noise or Vibration
Signs include rattling, knocking, or grinding during operation — or increased vibration through the unit or mounting surface.
Check for:
- Worn or unstable vanes — research on rotary vane compressors shows insufficient vane force can cause a "jumping phenomenon," unsealing compression chambers and producing vibration and noise
- Loose mounting hardware or degraded vibration isolation pads
- Low or degraded lubricating oil reducing cushioning between vane surfaces
- Worn bearings (a grinding tone distinct from rattling)
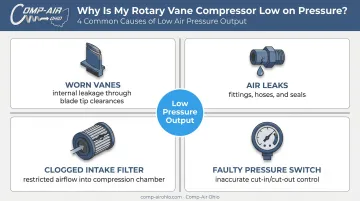
Problem 3: Low Air Pressure or Slow Pressure Buildup
If the pressure gauge reads below operating range, tools receive insufficient air, or the compressor runs continuously without reaching cut-out pressure, internal leakage is often the culprit.
Likely causes:
- Worn vanes reducing sealing efficiency — Purdue research on sliding vane compressors confirms internal leakage through blade edges and tip clearances directly reduces the volume of gas delivered at discharge pressure
- Air leaks at fittings, hose connections, or seals
- Clogged intake air filter restricting airflow into the compression chamber
- Malfunctioning pressure switch preventing accurate cut-in/cut-out control
Problem 4: Overheating and Thermal Shutdown
Unexpected mid-cycle shutdown, a high-temperature alarm, or a unit that's hot to the touch after short run times all point to heat management issues.
Start here:
- Low or degraded oil — the HV11–HV45 manual states bulk oil must not exceed 90°C / 194°F (or 100°C / 212°F for HPO synthetic), and oil life drops significantly above these temperatures
- Blocked cooling fins or inadequate room ventilation
- Dirty oil cooler restricting heat dissipation
- Operating beyond the rated duty cycle
Why Hydrovane Compressors Fail: Root Causes
Most failures trace back to four categories rather than random defects. Identifying the category prevents the same fault from recurring.
Oil system neglect is the most common root cause. Degraded oil accelerates vane and rotor wear directly — once lubrication breaks down on the vane sliding surface, friction increases and damage compounds fast. The HV11–HV45 manual specifies an oil change kit at 2,000 hours or 12 months, whichever comes first, using approved Fluid Force Red 2000 mineral oil or Fluid Force HPO synthetic.
Filtration failure comes second. Clogged air or oil filters restrict airflow, raise internal temperatures, and force the compressor to work harder — each effect compounds the others.
Environmental conditions account for many thermal faults. The standard HV11–HV45 operates within 0–45°C / 32–113°F ambient range (tighter for RS regulated-speed models at 0–40°C). Exceeding that range without additional cooling measures shortens oil life and accelerates wear.
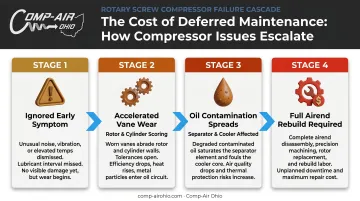
Deferred maintenance amplifies all three — small problems left unaddressed escalate quickly through the system. When issues are ignored:
- Vane wear accelerates into rotor or cylinder scoring
- Oil contamination spreads through the separator and cooler
- What could have been a vane set replacement becomes a full airend rebuild
- Unplanned downtime multiplies repair costs with lost production
How to Troubleshoot a Hydrovane Compressor Step by Step
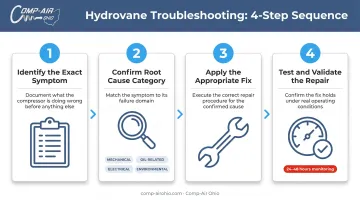
Attempting repairs without first identifying the problem wastes time, risks introducing new faults, and can void warranty coverage. Follow these four steps in order.
Step 1: Identify the Exact Symptom
Before touching any components, observe and document:
- Visible indicators: oil puddles, alarm lights, pressure gauge readings, unusual sounds
- Operational context: does the problem occur at startup, under load, after extended run time, or continuously?
- Recent history: was oil changed on schedule? Any recent filter replacements? Any changes to operating environment?
Write it down — this record speeds up self-diagnosis and helps any service technician get to the root cause faster.
Step 2: Confirm the Root Cause Category
Determine whether the issue is:
- Mechanical — vane wear, bearing failure, loose components
- Oil-related — level, quality, separator saturation, leaks
- Electrical/control — pressure switch, thermal cutout, start capacitor, wiring
- Environmental — ambient heat, poor ventilation, contaminated intake air
Check oil level, power supply, and filter condition before assuming internal mechanical damage.
Step 3: Apply the Appropriate Fix
Oil-related problems:
- Check oil level against the sight glass; top up with manufacturer-specified Hydrovane lubricant (Fluid Force Red 2000 or HPO synthetic — incorrect oil type is a documented cause of high oil temperature and invalidates warranty)
- Replace oil and oil filter if overdue or visibly discolored
- Inspect the oil separator element; replace at the scheduled interval (2,000 hours on standard schedule, 4,000 hours on HPO extended schedule per HV11–HV45 manual)
Mechanical problems:
- Inspect accessible vane slots for broken or excessively worn vanes
- Check that mounting bolts are tight and vibration pads are intact
- A grinding bearing tone warrants professional inspection; internal vane or rotor work should be performed by a qualified technician
Electrical/control problems:
- Test pressure switch calibration against rated cut-in and cut-out pressures
- Inspect wiring terminals for corrosion or looseness
- Reset thermal cutout only after the unit has cooled and the overheating root cause has been addressed — not before
Environmental/operational problems:
- Clear obstructions around cooling intake and exhaust
- Verify ambient temperature stays within the manufacturer's specified range
- Clean external cooling fins with compressed air
- Confirm the unit isn't exceeding its duty cycle rating
Step 4: Test and Validate the Repair
Don't close out a repair until the unit has proven stable under normal operating conditions.
- Restart and observe pressure buildup time, noise level, and operating temperature through a full cycle
- Confirm the unit reaches cut-out pressure without tripping or alarming
- Monitor for 24–48 hours of normal operation before considering the repair complete
- Track oil consumption rate and watch for any return of original symptoms
Fix It or Replace It? Knowing When to Call a Professional
The Hydrovane's 100,000+ hour service life means most units are worth repairing rather than replacing, provided issues are caught early. That changes once internal wear has reached the rotor or cylinder walls.
Serviceable repairs :
- Worn vane sets
- Clogged or saturated oil separators
- Faulty pressure switches or thermal cutouts
- Oil system issues including filter, separator, and lubricant replacement
- Electrical control faults with genuine OEM components
Major rebuild or replacement warranted:
- Scored cylinder walls
- Cracked or damaged rotor
- Repeated thermal failures that have caused cascading damage across multiple components
At that stage, compare rebuild cost against new unit value before committing. Comp-Air Ohio's factory-trained technicians can assess which path makes financial sense for your Northern Ohio operation. They've been servicing Hydrovane equipment since 1977 and stock genuine OEM parts.
Call immediately — do not attempt further self-diagnosis — if:
- The compressor produces sparks or shows signs of electrical arcing
- A burning smell is present during operation
- Pressure drops suddenly and severely under load
- Any symptom appears after a known impact, flood, or contamination event
Preventive Maintenance to Keep Your Hydrovane Running
Most Hydrovane service calls are avoidable. The rotary vane design is built for longevity, but only if you follow the maintenance schedule. Neglect it, and wear accelerates fast.
Core maintenance actions:
| Task | Frequency |
|---|---|
| Check oil level (sight glass) | Daily |
| Inspect intake air filter | Monthly |
| Oil change + oil filter replacement | 2,000 hours or 12 months (HV11–HV45) |
| Oil separator element replacement | 2,000 hours (standard) / 4,000 hours (HPO schedule) |
| Unloader valve seal inspection | 4,000 hours |
| Full internal airend inspection | 20,000 hours |

A few practical points:
- Use only Hydrovane-approved lubricant. Unapproved oils contribute to high oil temperature and void warranty coverage
- Keep the compressor room clean and within the 0–45°C / 32–113°F ambient range for standard HV11–HV45 models
- Log every service action with date, operating hours, and parts used. That record is essential for warranty claims and gives Comp-Air Ohio's service team the full picture when you need support.
Staying current on these intervals is the single most effective way to avoid the faults covered in this guide.
Frequently Asked Questions
What is the most common cause of air compressor failure?
Deferred maintenance leads the list: neglected oil changes, clogged filters, and ignored early warning signs. Oxidative lubricant degradation is the most common lubricant failure mode in compressors, and contaminated intake air can blind filters and cause compounding pressure drops throughout the system.
Are Hydrovane compressors any good?
Hydrovane rotary vane compressors perform reliably, run quietly, and deliver long service life. The rotary vane design has fewer moving parts than many alternatives, and Gardner Denver's claim of 100,000+ operating hours without an airend replacement makes them a strong choice for facilities prioritizing uptime and low total cost of ownership.
What are the symptoms of a faulty unloader valve on an air compressor?
The compressor struggles or fails to restart after cycling off, excess pressure remains in the discharge line, or the motor strains against back-pressure on startup. The HV11–HV45 manual schedules unloader valve seal replacement at 4,000 hours — if symptoms appear before that interval, inspect, clean, or replace the valve assembly.
How long do Hydrovane compressors last?
With proper oil management, filter maintenance, and adherence to the OEM service schedule, Hydrovane compressors are designed to deliver over 100,000 operating hours. That figure is a manufacturer claim tied to correct maintenance. Neglected units should not expect the same result.
How often should the oil be changed on a Hydrovane compressor?
For HV11–HV45 models, the manufacturer specifies an oil change kit at 2,000 hours or 12 months, whichever comes first. Only use approved Hydrovane lubricants (Fluid Force Red 2000 mineral or Fluid Force HPO synthetic). Using the wrong oil type is a documented cause of elevated operating temperature and warranty invalidation.
Can I troubleshoot a Hydrovane compressor myself, or do I need a technician?
Basic checks — oil level, filter condition, pressure switch settings, and power supply — can be performed by trained facility staff. Any work involving internal components such as vanes, the rotor, or the cylinder requires a qualified technician to avoid further damage and maintain warranty compliance.