Poor installation rarely fails immediately. Instead, it creates chronic problems: moisture carryover into pneumatic tools, thermal overload trips that shut down production, premature dryer failure, and potential violations of ISO 8573-1:2010 air quality standards. Those downstream consequences are far more expensive than getting the installation right the first time.
This guide covers the complete installation process — from site preparation and positioning through piping, electrical hookup, and post-installation validation — following established industry best practices.
Key Takeaways
- Install in sequence: site prep, positioning, bypass piping, filter integration, electrical hookup, then validation
- Never install a dryer on top of or directly adjacent to the compressor
- Pre-filters and post-filters are mandatory, not optional add-ons
- Refrigerant circuit work legally requires an EPA Section 608-certified technician
- Confirm CFM rating, working pressure, and inlet temperature match your actual system conditions before starting
Installing a Compressed Air Dryer: Step-by-Step Guide
Installation breaks into four phases: preparation, placement and piping, electrical integration, and validation. Skipping or shortcutting any phase tends to create delayed failures that are difficult to diagnose weeks after startup.
A straightforward single-dryer installation by a qualified technician typically takes a half-day. Multi-dryer setups or installations requiring new electrical circuits may need a full day and coordination between mechanical and electrical trades.
Prerequisites and Safety Considerations
Confirm site readiness before touching any hardware:
- Ambient temperature must fall within the dryer's rated range — check the manufacturer's specs for your specific model; Gardner Denver's XGCY Series, for example, is rated for 100°F ambient under standard conditions, with certain models tolerating up to 131°F
- Ventilation must be adequate to exhaust heat from the dryer condenser — Atlas Copco's compressor room guidance recommends limiting room temperature rise to 7–10°C
- Drain path must be clear, with a condensate line that slopes downward without back pressure
- Floor or mounting surface must support the dryer's weight
Run compatibility checks against your existing system:
- Dryer rated CFM must equal or exceed maximum compressor output
- Dryer maximum working pressure (MWP) must exceed system pressure
- Inlet temperature from the compressor or aftercooler must fall within the dryer's rated limit — most standard refrigerated dryers specify a maximum of 50°C (122°F)
Compliance Requirements:
- Refrigerant circuit work on refrigerated dryers requires EPA Section 608 certification; since January 1, 2018, this requirement applies to HFCs including R-410A and R-407C
- Apply OSHA 29 CFR 1910.147 lockout/tagout procedures before any connections to pressurized or energized systems — pneumatic energy counts as a hazardous energy source under OSHA's LOTO standard
- Electrical supply must match nameplate voltage, phase, and amperage; NEC Article 250 governs grounding and bonding requirements
Tools and Parts Required
Mechanical components:
- Isolation valves (inlet and outlet)
- Bypass valve and bypass piping assembly
- Flexible hose sections or vibration isolator couplings
- Coalescing pre-filter housing and element
- Particulate post-filter housing and element
- Automatic drain valve (for both filter housings)
- Pipe fittings rated for system pressure
- PTFE tape or anaerobic thread sealant rated for compressed air
- Pressure gauges, torque wrench, and level
Specialized requirements:
- EPA Section 608-certified technician with manifold gauge set for any refrigerant circuit work
- Lockout/tagout hardware
- Appropriately rated electrical conduit, wiring, and circuit breaker sized to dryer nameplate
- For desiccant dryers: verify desiccant charge is fresh and muffler outlet is unobstructed (note that on ZEKS Eclipse ZPB models above 2,700 SCFM, desiccant ships loose and requires field loading)
How to Install a Compressed Air Dryer
Step 1 — Prepare the site and mount the dryer
Mount the dryer on a dedicated stand or shelf — floor placement and compressor-top mounting both cause vibration and heat problems. Maintain manufacturer-specified clearances on all sides; most refrigerated dryer manufacturers target roughly 1 meter (3 feet) near the condenser, and SMC's installation manual specifies a minimum of 600mm around heat-dissipating surfaces.
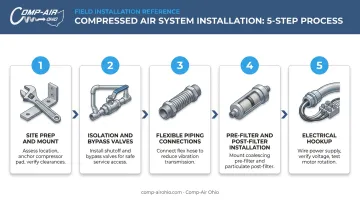
Ensure the drain connection exits at the lowest point and the drain line slopes downward freely without any back pressure.
Step 2 — Install isolation and bypass valves
Before connecting the dryer into the main air line, install isolation valves on both the inlet and outlet, then plumb a full bypass line with its own valve around the dryer. This allows the air system to keep running during future maintenance. Without this bypass, any future dryer service requires a full system shutdown.
Step 3 — Connect piping using flexible connections
Connect dryer inlet and outlet using flexible hose sections to isolate the dryer from compressor vibrations. Rigid direct connections transmit vibration into the dryer's internal components and cause premature failure. Follow the flow direction arrows marked on the dryer housing, and slope condensate drain piping downward continuously.
Step 4 — Install pre-filter and post-filter
Install a coalescing pre-filter directly at the dryer inlet to remove bulk liquid water and oil aerosols before they enter the dryer. This protects the heat exchanger and is critical for maintaining rated dewpoint performance. Install a particulate post-filter on the dryer outlet to protect downstream equipment.
Fit automatic drain valves on both filter housings — CAGI's compressed air treatment guidance specifically calls for automatic condensate drains at dryers and filter housings to prevent moisture carryover. Key reasons automatic drains matter here:
- Manual drains rely on consistent operator attention — and get skipped
- Flooded filter housings bypass moisture directly into the air system
- Operating Gardner Denver dryers without a coalescing pre-filter with auto drain voids the warranty
Step 5 — Complete electrical hookup
Connect the dryer to a dedicated power supply matching nameplate voltage, phase, and amperage. Gardner Denver's XGCY Series smaller models (10–125 CFM) are wired for 115V/1Ph/60Hz; larger models and the Eclipse desiccant heated regeneration series use 460V/3Ph/60Hz. On three-phase models, verify correct phase rotation before first start — incorrect phase rotation causes the compressor to run backward. Complete this step with or have it verified by a licensed electrician.
Post-Installation Checks and Validation
Don't skip validation — installation errors that slip through here tend to show up later as moisture in your air lines or unexplained pressure loss.
Pre-Pressurization Visual Checks
Before introducing any pressure:
- Verify all pipe connections are properly sealed
- Confirm flexible connections are not kinked or under tension
- Check that the drain line is unobstructed and slopes correctly
- Confirm the bypass valve is closed
- Verify the dryer is level and stable on its mounting
Functional Testing Under Operating Pressure
- Pressurize slowly through the bypass first to check the system for leaks
- Route flow through the dryer; check all connections with soapy water or an electronic leak detector
- Allow refrigerated dryers adequate warm-up time before full load — most manufacturers specify at least 5 minutes before restart and a maximum of 6 starts per hour; consult your specific dryer's installation manual for exact limits
- Verify the automatic drain is cycling correctly
- Check pressure differential across the dryer — CAGI and Compressed Air Best Practices document typical dryer pressure drop at 3–5 psid; a drop significantly above your dryer's rated value indicates a problem
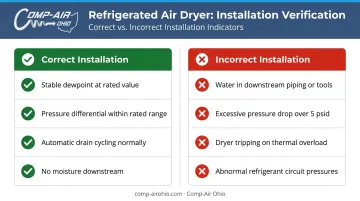
Indicators of Correct vs. Incorrect Installation
| Correct Installation | Incorrect Installation |
|---|---|
| Stable dewpoint at or near rated value | Water found in downstream piping or tools |
| Pressure differential within rated range | Excessive pressure drop (>5 psid) |
| Automatic drain cycling normally | Dryer tripping on thermal overload |
| No moisture detected downstream | Abnormal refrigerant circuit pressures |
Once the system passes these checks, your dryer is ready for normal operation — the next step is establishing a routine maintenance schedule to keep performance within spec.
Where to Install Your Compressed Air Dryer in the System
Dryer Placement Relative to the Compressor
Never place the dryer directly on top of or adjacent to the compressor:
- Compressors exhaust heat from their top surfaces, raising local ambient temperature and degrading refrigerated dryer efficiency
- Compressor vibrations transmit into the dryer and damage internal components
- Condensate from the dryer can drain onto the compressor if the drain line shifts, creating corrosion and electrical hazards
Before or After the Air Receiver?
Both configurations are used; the right choice depends on your application.
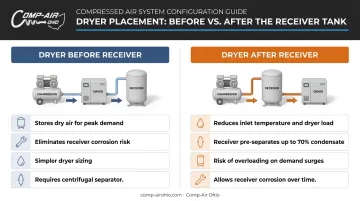
Dryer before receiver:
- Stores dry air for peak demand buffering
- Eliminates corrosion risk inside the receiver
- Simpler dryer sizing based on known compressor output
- Requires a centrifugal separator before the dryer to remove bulk condensate
Dryer after receiver:
- Reduces inlet temperature and dryer load — Kaeser's technical guidance notes the receiver can pre-separate up to 70% of condensate
- Risk of dryer overloading on sudden demand surges
- Allows condensate to corrode the receiver interior over time
Choose upstream placement when consistent dry air quality at peak demand is required. Downstream placement can work in smaller systems with moderate, predictable demand.
Once you've settled on receiver placement, filter positioning and physical siting determine whether the dryer can perform as specified.
Filter Placement and Siting Rules
- Pre-filters belong at the dryer inlet, not at the compressor outlet — air continues to cool and condense moisture in the interconnecting piping
- Post-filters protect downstream equipment from particulate and any desiccant fines
- ISO 8573-1 Class 1 or 2 applications need a point-of-use desiccant dryer to supplement the central refrigerated dryer
- Install on a stand at service height, away from heat sources (boilers, direct sunlight), with adequate room ventilation
Common Installation Problems and Fixes
Most installation problems fall into three categories: heat management, moisture control, and pressure loss. Here's how to diagnose and fix each one.
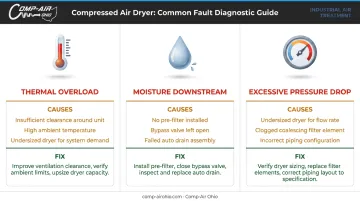
Dryer Repeatedly Tripping on Thermal Overload
Symptoms: The dryer shuts down on a high-temperature fault shortly after startup or during peak production.
Likely causes:
- Insufficient clearance around the condenser starving it of airflow
- Ambient temperature in the equipment room exceeds the dryer's rated maximum
- Dryer undersized for actual compressed air flow
Fix: Restore manufacturer-specified clearances; improve room ventilation; verify actual CFM against dryer rated capacity.
Moisture Reaching Downstream Equipment
Symptoms: Water or high humidity found in air lines, tools, or pneumatic equipment despite the dryer running.
Likely causes:
- No pre-filter installed, allowing liquid water slugs to overwhelm the dryer
- Bypass valve partially open
- Automatic drain valve failed, with condensate accumulating inside the dryer
- Inlet air temperature exceeding the dryer's rated limit
Fix: Install or service the coalescing pre-filter; confirm the bypass valve is fully closed; service or replace the automatic drain valve.
Excessive Pressure Drop Across the Dryer
Symptoms: Pressure loss between inlet and outlet exceeds the dryer's rated differential at normal operating flow.
Likely causes:
- Dryer undersized for actual CFM demand
- Clogged pre-filter element restricting airflow
- Undersized or incorrectly installed piping connections
Fix: Check actual flow rate against dryer rating; replace clogged pre-filter element; verify piping diameter matches system design requirements. Every 1 psi of unresolved pressure loss increases compressor energy consumption by approximately 0.5%—so addressing this early pays off on your utility bill.
If these fixes don't resolve the issue, the problem may be upstream of the dryer—consult your installation drawings or reach out to a qualified compressed air technician.
Pro Tips for Installing a Compressed Air Dryer Effectively
Pre-cool compressed air before it reaches the dryer. Compressors without a proper aftercooler can discharge air well above the inlet temperature limit of most standard refrigerated dryers (typically 50°C/122°F). If an aftercooler is not already in place, either install one or route enough interconnecting pipe to allow natural cooling. Measure actual inlet temperature at the dryer connection point. Don't estimate.
Document the installation thoroughly. Record the installation date, dryer model and serial number, rated and actual operating parameters (CFM, inlet pressure, inlet temperature), electrical configuration, and pre/post-filter specifications. This documentation supports warranty claims. Gardner Denver's Platinum 10-Year Extended Warranty requires equipment to be maintained per the operations manual, and installation records are the starting point for any warranty conversation.
Know when to bring in a specialist. Several situations call for licensed or professionally designed work rather than a straight DIY install:
- Refrigerant work: Leak testing and recharging requires an EPA Section 608-certified technician in most U.S. jurisdictions — this is a legal requirement
- Parallel multi-dryer systems: Thermal load balancing across multiple units benefits from professional system design
- Regulated industries: Food and beverage, pharmaceutical, and medical device facilities may need documented professional commissioning to satisfy ISO 8573-1 requirements
Comp-Air Ohio's factory-trained technicians and licensed refrigeration specialists provide installation and startup support for Gardner Denver dryer systems across Northern Ohio.
Frequently Asked Questions
Where should a compressed air dryer be installed?
Install the dryer downstream of the compressor and aftercooler, mounted on a stand or shelf with adequate clearance on all sides. Keep it in a clean, well-ventilated area with a clear condensate drain path.
Should a compressed air dryer be installed before or after the air receiver?
Upstream placement stores dry air for peak demand and prevents receiver corrosion, but requires a centrifugal separator before the dryer. Downstream placement reduces dryer inlet temperature and load — the better option when consistent dewpoint matters less than thermal efficiency.
Do I need a pre-filter before a compressed air dryer?
Yes — a coalescing pre-filter is essential before any compressed air dryer. It removes bulk liquid water and oil aerosols that would overwhelm the dryer and prevent it from reaching rated dewpoint. For Gardner Denver dryers, operating without a coalescing pre-filter with auto drain voids the warranty.
Can I install a compressed air dryer myself?
A qualified in-house technician can handle mechanical installation — piping, bypass valves, and filter housings. Electrical connections should be made or verified by a licensed electrician. Any refrigerant circuit work on refrigerated dryers legally requires an EPA Section 608-certified technician.
What happens if a compressed air dryer is incorrectly installed?
Improper installation leads to moisture carryover into downstream equipment, accelerated corrosion of piping and tooling, thermal overload shutdowns, and failure to reach rated dewpoint. In regulated industries, it can also result in ISO 8573-1 air quality non-compliance and potential product contamination.
How much clearance does a refrigerated air dryer need?
Most manufacturers specify approximately 1 meter (3 feet) of clearance around heat-dissipating surfaces, particularly near the condenser. SMC's installation documentation specifies a minimum of 600mm. Installing in a tight corner or against a wall is one of the most common causes of thermal overload shutdowns.