Who should handle it? Factory-trained technicians or qualified mechanical and electrical contractors with compressed air system experience. In-house teams can assist with site preparation, but should not lead the electrical connections, ventilation design, or commissioning without proper expertise.
This guide walks through the complete process — from site readiness and prerequisites through step-by-step setup, post-installation validation, and the most common problems to avoid.
Key Takeaways
- Confirm site readiness — floor load capacity, ventilation, and a dedicated electrical circuit — before equipment arrives
- Every 2 psig of excess operating pressure raises energy consumption by approximately 1% — set baseline pressure correctly from day one
- Plan for heat removal: 80–93% of electrical input converts to heat that must be exhausted from the compressor room
- Post-installation validation — no-load test, leak check, baseline data recording — is required before full operation
- Cut corners on any stage and you risk premature equipment failure, code violations, or chronic energy waste
Industrial Air Compressor Installation: The Process Overview
Every industrial compressor installation follows a defined sequence:
- Pre-installation planning
- Site and room preparation
- Physical placement and mechanical connections
- Electrical integration
- Air treatment and piping
- Startup and validation
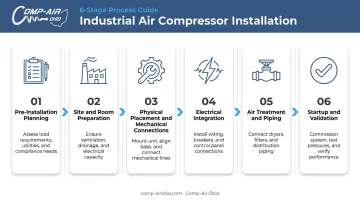
Skipping ahead — say, running piping before electrical is confirmed — can mean tearing out completed work when specs change. A full industrial installation typically requires coordination between an electrical contractor, an HVAC professional, and a compressed air specialist. Build in adequate project lead time, particularly if the compressor room needs structural or utility modifications before the equipment arrives.
If your facility is in Northern Ohio, Comp-Air Ohio offers compressed air system design and turnkey installations. Their factory-trained team can review your site plans before installation begins — catching layout problems at the drawing stage costs a fraction of what corrections run after walls are closed or concrete is poured.
Prerequisites and Safety Considerations
Floor Load and Structural Capacity
Confirm the floor can support the unit before scheduling delivery. While many rotary screw compressors don't require a special foundation, the weights involved are significant:
- A 200 hp Atlas Copco unit weighs approximately 10,388 lb
- A 350 hp unit can reach 13,772 lb in full-feature configuration
Verify floor flatness and structural capacity using OEM submittal data and engineering input for larger units. Do not rely on generic slab thickness rules — use the manufacturer's actual weight and footprint specifications.
Environmental Conditions
The compressor room must meet these conditions before installation proceeds:
- Dry and clean — no exposure to rain, standing water, or corrosive agents
- Temperature within OEM limits — standard operation typically up to 46°C (115°F), with high-ambient options available up to 55°C (131°F); room temperature must not drop below freezing
- Protected from contaminants — intake air must be free from ammonia, chlorine, and salt spray; verify specific contaminant exposure limits with the OEM for your environment
Once ambient conditions are confirmed, turn to the electrical supply — voltage quality has a direct impact on motor life and uptime.
Electrical Infrastructure
Confirm the main electrical service can support the compressor's voltage, phase, and amperage requirements before installation day. Key electrical requirements:
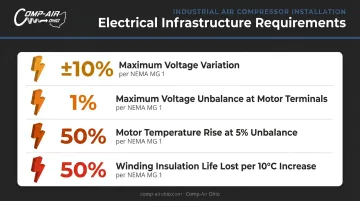
- NEMA MG 1 supports motor operation with ±10% voltage variation from nameplate rating
- Voltage unbalance at motor terminals should not exceed 1% — a 5% unbalance can raise motor temperature rise by 50%
- Winding insulation life is reduced by half for each 10°C temperature increase — voltage quality directly affects equipment lifespan
- Electrical work must comply with NEC Article 430 and be performed by a licensed electrician
Stop — do not proceed with installation if any of the following apply:
- Floor load capacity has not been verified against OEM specifications
- Ambient temperature falls outside manufacturer-specified limits
- Adequate ventilation cannot be confirmed
- Supply voltage does not match the compressor nameplate rating
How to Install an Industrial Air Compressor: Step-by-Step
Each step below builds on the last. Skipping or reversing the sequence — particularly powering up before electrical and piping checks are complete — causes failures that are expensive to diagnose and often voids the warranty.
Step 1: Prepare the Installation Site
- Clean and inspect the floor surface for levelness and condition
- Install vibration isolation pads at all mounting points before the unit arrives
- Confirm a minimum of three feet of clearance on all sides for airflow and maintenance access
- Plan and build ventilation ducting before the compressor arrives if forced ventilation is required
For ventilation sizing, use the formula: CFM = sensible heat (BTU/hr) ÷ (1.08 × allowable temperature rise). Industrial rotary screw compressors produce approximately 3,000 BTU/hr per horsepower — a 100 hp unit is a substantial heat load that must be calculated, not estimated.
Step 2: Position and Secure the Compressor
- Use appropriately rated lifting equipment (forklift or pallet jack rated for the unit's weight)
- Place the unit on isolation pads and confirm it is level with full base contact on the pad surface
- Do not anchor directly to concrete without isolation material — this transmits vibration and noise into the structure
Step 3: Integrate Electrical Supply
- Have a licensed electrician connect the dedicated circuit to the electrical cabinet under NEC Article 430
- Verify supply voltage at the cabinet terminals matches the nameplate; actual operating voltage must fall within ±10%
- Confirm proper grounding throughout
- For VSD units: verify phase balance and confirm the transformer provides a symmetrical three-phase supply before startup. Asymmetrical supply is a leading cause of VSD compressor failures at commissioning
Gardner Denver VFD installations require wire sizing based on drive input amps plus ancillary loads, multiplied by 1.25 per NEC 430.122.
Step 4: Connect Piping and Air Treatment
Proper piping design directly affects energy consumption. CAGI recommends keeping compressed-air piping velocity at 20 ft/s or lower, and total system pressure drop should stay well under 10% of discharge pressure.
Follow this sequence for piping connections:
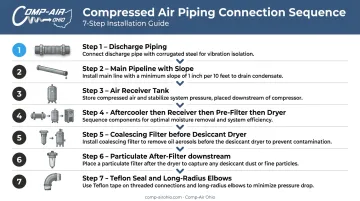
- Install discharge piping at minimum the same diameter as the compressor outlet (never smaller)
- Run the main pipeline with a slight slope toward drain points to allow condensate drainage
- Install the air receiver tank: size at 1–2 gallons per CFM for fixed-speed compressors, or 2–4 gallons per CFM for VSD applications
- Connect the aftercooler, then the receiver, then the pre-filter, then the dryer — in that order
- Install a coalescing filter before any desiccant dryer to prevent fouling the desiccant bed
- Install a 1-micron particulate after-filter downstream of desiccant dryers to capture desiccant fines
- Seal all joints with Teflon tape on threaded connections; use long-radius elbows instead of sharp 90° bends wherever possible
Comp-Air Ohio supplies Gardner Denver's Quick-Lock and Big-Lock aluminum piping systems, rated for 300 PSI and 300°F, in sizes from 14 mm to 273 mm (½" to 10") for compressed air, vacuum, and inert gas distribution.
Post-Installation Checks and Validation
Pre-Start Visual Check
Before energizing the system, confirm:
- All piping connections are tight and correctly sequenced
- Electrical cabinet is closed and properly grounded
- Oil level is correct (oil-lubricated units)
- No transport spacers, packaging materials, or debris remain in place
No-Load Startup Test
- Start the compressor without system load
- Listen for unusual mechanical noise or vibration
- Monitor temperature and pressure gauges during the run-in period
- Gradually apply load while watching airflow, pressure, and temperature readings remain within spec
Baseline Data Recording
The DOE recommends recording system specifications when a new system is first set up and operating properly. Document:
- Operating pressure, flow rate, ambient temperature, and power draw
- Phase voltages at the electrical cabinet terminals
- Leak scan results — aim to keep leaks below 5–10% of total system flow
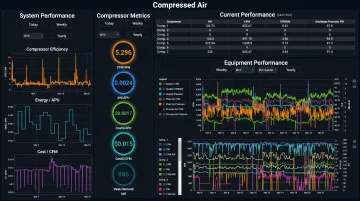
This baseline is essential for maintenance benchmarking and for catching performance decline before it becomes a costly failure. Where remote monitoring is available — such as Gardner Denver's iConn system — connect it at commissioning so trend data and fault alerts begin accumulating from day one.
Common Installation Problems and Fixes
Overheating Shortly After Startup
Problem: Compressor trips on high temperature within the first hours of operation.
Likely cause: Inadequate ventilation — the room is too small for natural ventilation, ductwork has too many bends creating back pressure, or exhaust air is recirculating back into the air inlet.
Fix: Verify forced ventilation is sized for the unit's actual heat output in BTU/hr. Each duct fitting adds airflow resistance, so use Total Equivalent Length calculations — not fixed estimates — when sizing ductwork. If back pressure remains an issue, engage an HVAC professional to re-evaluate the duct design.
Voltage Mismatch or Phase Imbalance on Startup
Problem: Compressor fails to start, trips immediately, or runs erratically; electrical faults appear on the controller display.
Likely cause: Supply voltage does not match nameplate, or the three-phase supply is asymmetrical (particularly common with VSD units).
Fix: Address in two steps before restarting:
- Have a licensed electrician verify supply voltage at the cabinet terminals under load conditions
- For VSD compressors, confirm phase balance and transformer configuration — voltage unbalance above 1% requires motor derating
Pressure Drop Across the Distribution System
Problem: Downstream equipment receives insufficient pressure despite the compressor running at full output.
Likely cause: Discharge piping undersized relative to the compressor outlet, excessive sharp bends creating friction losses, or small-bore fittings acting as restrictions.
Fix: Audit the full piping layout from discharge to the furthest point of use, then address:
- Replace any pipe runs undersized relative to the compressor outlet
- Substitute long-radius elbows for sharp 90° bends to reduce friction losses
- Verify the receiver tank is correctly sized for peak demand
- Check all fittings for small-bore restrictions
Every 2 psig of excess pressure needed to overcome distribution losses adds approximately 1% to compressor power consumption — so these fixes pay off fast.
Pro Tips for Installing an Industrial Air Compressor Effectively
Engage your compressed air specialist before finalizing the room layout. Duct routing, pipe run length, and electrical panel proximity are far easier and cheaper to address at the design stage than after concrete is poured or walls are closed. A site plan review before breaking ground can eliminate costly retrofits down the line.
Install remote monitoring from day one. Gardner Denver's iConn system provides 24/7 remote visibility, real-time KPIs, fault alerts, and historical trend data through the Air Command portal — catching issues before they interrupt production.
Document everything during installation. Photograph all electrical connections, piping layouts, and nameplate data before covering them. A commissioning record with baseline pressure, flow, temperature, and power readings is essential for warranty claims and speeds up future service calls.
Plan for future maintenance access, not just current access. Ensure drain valves, filter housings, oil fill/drain ports, and electrical cabinet doors are reachable without moving equipment. Inadequate maintenance clearance is one of the most common regrets of rushed installations.
Conclusion
Every stage of industrial air compressor installation — from floor preparation and ventilation design through electrical matching, piping, and post-startup validation — directly determines how the system performs, how long it lasts, and whether it operates safely. Done right, the installation pays for itself through fewer breakdowns, lower energy bills, and a longer equipment lifespan.
Treat installation as a coordinated, multi-trade project requiring proper planning, qualified execution, and thorough sign-off. When in doubt, work with a factory-trained compressed air specialist — Comp-Air Ohio's team has been handling installations across Northern Ohio since 1977 and can ensure the job is done correctly from day one.
Frequently Asked Questions
How much does it cost to get an air compressor installed?
Installation costs vary based on site conditions, compressor size, and system complexity. Common cost drivers include:
- Rigging and equipment placement
- Electrical service upgrades and disconnect panels
- Ventilation ducting and exhaust routing
- Compressed air piping and receiver tanks
- Dryers, filters, and ancillary equipment
- Permits, inspections, and commissioning labor
Get a site-specific quote from a qualified compressed air specialist for an accurate figure.
How much does an industrial air compressor cost?
Pricing depends on type (rotary screw vs. reciprocating), horsepower, and oil-free vs. oil-lubricated configuration. Small reciprocating units start in the low thousands; larger rotary screw systems can reach six figures. Total cost of ownership — energy consumption, maintenance intervals, and downtime risk — matters as much as the purchase price. A distributor like Comp-Air Ohio can help you compare options across your actual load requirements.
Does an industrial air compressor need a dedicated electrical circuit?
Yes. A dedicated circuit with a properly sized breaker or fused disconnect, designed and installed under NEC Article 430, is required. Sharing a circuit with other high-draw equipment risks overload, voltage fluctuation, and compressor damage.
How much clearance space is needed around an industrial air compressor?
Most manufacturers require a minimum of three feet of open space on all sides for adequate cooling airflow and safe technician access during maintenance. Larger units may require more — always refer to the manufacturer's installation manual for your specific model.
Do you need a permit to install an industrial air compressor?
Permit requirements vary by jurisdiction. In Ohio, for example, electrical work and pressure vessel installation typically require permits and inspections. Ohio Boiler and Pressure Vessel rules reference ASME code stamping requirements, and most electrical work requires a permit. Confirm requirements with your local authority having jurisdiction before starting work.
Can you install an industrial air compressor yourself, or should you hire a professional?
Facility maintenance teams can assist with site preparation, but electrical connections, ductwork sizing, and system commissioning require qualified professionals. Improper installation can void the manufacturer's warranty (Gardner Denver explicitly excludes equipment altered by unauthorized personnel) and creates real safety hazards. For Northern Ohio facilities, Comp-Air Ohio's factory-trained technicians handle full installation and commissioning.